ASIST (Automated Security Issue Scanning Tool)
![]()
ASIST is a regex-based, blazing-fast Static Application Security Testing (SAST) tool for securing Salesforce apps at developer speed.
Originally built for internal use at Certinia to support Security Reviews, we have now decided to release it to the community 🌍
⭐ Features
- ⚡ Fast! Scan a single file in tens of milliseconds, and under a minute to scan a project with 2.5M lines of Apex code
- 👾 32 rules covering XSS, Sharing clauses, hardcoded secrets, and some more obscure pitfalls, all aligned with Salesforce security best practices
- 🖋️ Supports custom regex rules in config and standard rule overrides
- ✅ False positive management with comments or annotations
- ⚙️ VSCode extension for scanning as you code! See the extension for more details
- 💻 Multi-platform, multi-architecture (tested on Mac Intel, Mac Silicon, Windows, and Linux)
- 🚫 Respects .gitignore and .forceignore by default
- 🧩 YAML or JSON config, and JSON output for programmatic processing 😎
- 🏗️ CI/CD-ready without the disruption
- 📈 Baseline scan mode for generating metrics
▶️ VSCode extension demo
▶️ CLI demo
📥 Installing
Precompiled releases
- Download the binary of your choice from releases.
- Place the binary somewhere in your PATH
As a Go package
- Run
go install github.com/certinia/asist@latest
As VSCode extension
See installing VS Code extension
Build from source
- Install
goandmake - Clone this repo
- Install into your GOPATH:
make install
Alternatively:
- To just build the binary for your OS and architecture:
make - To cross-compile:
GOOS=windows GOARCH=amd64 go build -o asist.exe . - To build binaries for the most common platforms, run:
make build-binaries
🕹️ Usage
To see the help, run:
asist -h
Usage:
  asist [OPTIONS] [Path]

Application Options:
  -u, --repo-url=      URL of the repo. Used for baseline scan output
  -c, --config=        JSON or YAML config file to read from
  -r, --rules=         Rules comma separated to run (ignore rules enabled/disabled in config)
  -l, --list-rules     List rules which would be run
  -b, --baseline-scan  For getting output of ASIST baseline scan as count of occurrences and false positive occurrences, number of custom rules occurrences, type of record and this data is used for creating
                       metrics.
  -j, --cicd-rules     For use in CI/CD pipelines. Tells ASIST to only run the CICD rules defined in config file. If there are no CI/CD rules defined, no rules will be executed. If there are any occurrences, returns
                       a non-zero exit code which will make the pipeline step fail
  -v, --verbose        Print out debug messages with time elapsed since last message
  -V, --version        Display the current version of ASIST binary

Help Options:
  -h, --help           Show this help message

Arguments:
  Path:                Path to the file or folder to scan
🧩 Examples
Recursively scan the current working directory with default settings (all rules):
asist .
This scan produces the following output, indicating the total number of issues identified, the start and end timestamps, and the detailed findings:
{
 "Count": 161,
 "Started": "2025-07-23 13:12:08.231779 +0200 CEST m=+0.000501126",
 "Ended": "2025-07-23 13:12:08.307712 +0200 CEST m=+0.076432459",
 "Result": [
  {
   "ID": "ApexClassNoSharing",
   "Name": "Apex Class No Sharing",
   "Description": "Use of Apex classes where the sharing clause is not specified may cause confusion for other developers. Always set the most restrictive sharing clause for each class.",
   "Severity": "Medium",
   "RuleCategory": "Security",
   "Occurrence": {
    "File": "/Users/shaundoyle/sandbox/product/asist/files/testData/testFile.cls",
    "Line": "Class TestFile {",
    "LineNumber": 1,
    "ColumnRange": [
     0,
     14
    ]
   }
  },
  {
   "ID": "XSSFormAction",
   "Name": "Potential XSS with formaction in JS context",
   "Description": "Use of the formaction attribute in JavaScript context may introduce an XSS issue. Consider removing it, otherwise ensure that no user input is rendered unescaped.",
   "Severity": "High",
   "RuleCategory": "Security",
   "Occurrence": {
    "File": "/Users/shaundoyle/sandbox/product/asist/integrationtests/src/aura/aura.cmp",
    "Line": "    \u003cform id=\"test\"\u003e\u003c/form\u003e\u003cbutton form=\"test\" formaction=\"javascript:alert(1)\"\u003eX\u003c/button\u003e",
    "LineNumber": 3,
    "ColumnRange": [
     47,
     70
    ]
   }
  },
  [...]
Scan a single file with default settings:
asist force-app/main/default/classes/MyClass.cls
Print the ASIST version
asist -V
Scan a file with your config:
asist -c ./.asist.json force-app/main/default/classes/MyClass.cls
Scan with a single rule:
/asist -r ApexClassNoSharing .
Just list enabled rules, but don’t scan:
asist -l
asist -c .asist.yaml -l # Does not list rules disabled in your config
Run in verbose mode (for debugging):
asist -v .
Run in CI/CD mode (will only run rules added to cicdrules if this property is defined):
asist -j .
Run in baseline mode:
asist -b -u "https://github.com/certinia/asist.git" .
⚙️ Configuration
Most of the configuration required for your project will be defined in a configuration file.
ASIST supports YAML or JSON config files.
When scanning a folder, ASIST will automatically detect either .asist.yaml or .asist.json from the top-level folder being scanned.
Configuration files can also be explicitly specified using the -c argument (note that this is required when scanning a single file).
Within the config file, you can:
- Enable/disable all the standard rules
- Override certain properties of standard rules
- Exclude files or directories for all rules
- Exclude files or directories for specific rules
- Add custom regex rules
- Define rules to be run in CI/CD mode
See our example config file for a walkthrough of all config options.
🔧 Customizing Standard rules
Users can override certain properties of standard rules according to their needs, allowing them to customize the behavior of specific rules by:
- Disabling rules entirely:
enabled - Limiting the number of allowed rule violations:
cicdmaxissues - Tweaking rule severity:
severity - Tweaking what files should be scanned:
includepattern - Tweaking what files should not be scanned:
excludepattern
✍🏼 Creating Custom Rules
In addition to customizing standard rules, users can also create custom rules to define their own regex pattern:
customregexrules:
  NoDebugStatements:
    name: doNotDebug
    description: "Debug statements anticipate bugs; avoid bugs instead"
    enabled: false
    severity: Critical
    rulecategory: Security
    pattern: "System\\.debug\\("
    includepattern: "\\.cls$"
    excludepattern: "Test\\.cls$"
    cicdmaxissues: 10  # Allow up to 10 occurrences in CI/CD mode
You can test this specific rule like this:
asist -c .asist.yaml -r doNotDebug <file>
❌ False positive management
ASIST provides the ability to mark false positives with annotations, comments, or any other places where arbitrary text can be specified.
In the example below, the SessionIDApex rule is ignored for the statement:
// asist-ignore-begin:[SessionIDApex]
ID sid = UserInfo.getSessionID();
// asist-ignore-end
Various rule IDs may be comma-separated to ignore multiple rules for a particular block of code, and comments with justifications can be set after the asist-ignore-begin statement:
// asist-ignore-begin:[SessionIDApex,InsecureCryptoAlgorithm] This code is for testing, and not part of the package
ID sid = UserInfo.getSessionID();
Blob sidBlob = Blob.valueOf(sid);
Blob hash = Crypto.generateDigest('MD5', sidBlob);
[...]
// asist-ignore-end
In markup languages, comments should be set in <!-- comments --> when possible.
In any other file types, the user must figure out the more appropriate way to insert the asist-ignore-begin and asist-ignore-end statements. Technically, it doesn’t matter where you put them!
Note: Nested false positive tags are not supported.
🔁 CI/CD mode
CI/CD mode is enabled using the -j flag:
asist -j .
In this mode, by default, all enabled runs will be run if cicdrules property is not defined, but if the cicdrules config property contains any rule IDs, only these will be run. And, if cicdrules is defined but is blank (no rule is mentioned under this property), then no rules will be executed.
cicdrules:
  - "XSSDomHtml"
  - "XSSLabel"
  - "XSSMergeField"
This allows developers to add a subset of the overall ruleset to ASIST to their CI/CD pipelines, and gradually add more rules to CI/CD as they start clearing out findings for other rules. This prevents any issues for rules defined in cicdrules from creeping back into the codebase.
Rule Max Issues
When introducing ASIST to an existing codebase, you may have pre-existing security issues that you want to prevent from increasing while you work on fixing them. The cicdmaxissues property allows you to set maximum allowed issue counts for specific rules for CI/CD mode (with option -j) scanning only.
By default, rules have a limit of 0 issues. When a rule exceeds its cicdmaxissues threshold, ASIST will exit with an error code (see Exit Codes). You only need to set cicdmaxissues if you want to allow existing issues while preventing them from growing.
For standard rules, set cicdmaxissues under ruleoverrides:
ruleoverrides:
  XSSLabel:
    cicdmaxissues: 150  # Allow up to 150 XSSLabel issues (grandfather existing issues)
  XSSMergeField:
    cicdmaxissues: 0    # Explicitly set to 0 (same as default - no issues allowed)
  # XSSDomHtml has no cicdmaxissues set, defaults to 0 (no issues allowed)
For custom rules, set cicdmaxissues directly in the rule definition:
customregexrules:
  NoDebugStatements:
    name: doNotDebug
    severity: Critical
    pattern: "System\\.debug\\("
    includepattern: "\\.cls$"
    cicdmaxissues: 20  # Allow up to 20 existing debug statements while you clean them up
This feature allows you to:
- Gradually introduce stricter security requirements by lowering cicdmaxissues over time
- Prevent technical debt from growing while you address existing issues
- Start enforcing security on a codebase with 150 existing issues, then reduce to 100, 50, and eventually 0
📊 Baseline scans
This mode is intended for SecOps teams to create benchmarks across multiple projects and measure the adoption of ASIST.
Some overrides in config, such as severity, will be ignored to normalize data for apples-to-apples comparison between different code bases, and false positive findings will be included in the output.
Baseline mode is enabled by means of the -b flag.
It’s also recommended to specify a repository URL with the -u flag:
asist -b -u "git@github.com:certinia/asist.git" .
This command will output a JSON like this (when formatted):
[
 {
  "RepositoryName": "certinia/asist",
  "RepositoryURL": "git@github.com:certinia/asist.git",
  "RecordType": "Finding",
  "Content": {
   "FindingID": "b17fe249915712219aca7e",
   "IsCustom": false,
   "IsFalsePositive": true,
   "RuleID": "LwcNonStandardPositioning",
   "Severity": "Medium",
   "RuleCategory": "Security"
  }
 },
 {
  "RepositoryName": "certinia/asist",
  "RepositoryURL": "git@github.com:certinia/asist.git",
  "RecordType": "Finding",
  "Content": {
   "FindingID": "3a2861bee641864816b86d",
   "IsCustom": false,
   "IsFalsePositive": true,
   "RuleID": "LwcNonStandardPositioning",
   "Severity": "Medium",
   "RuleCategory": "Security"
  }
 }
]
A few differences can be observed compared to regular scans:
- Most of the “human-friendly” information is missing (e.g., the code location of the finding, the finding description, etc.)
- The repository name and URL will be included so that metrics systems can use this as a dimension for filtering.
- Each issue is assigned a
FindingID, which is effectively a hash that uniquely identifies the finding based on the rule, the finding location, and if it’s a false positive or not. - A few more properties are added, such as if the rule is custom, or if the finding is marked as false positive or not.
🫣 .gitignore and .forceignore files
By default, ASIST will ignore files and folders defined inside .gitignore and .forceignore. If you don’t want ASIST to respect .gitignore and .forceignore, you can use the following properties in the config file:
- dontgitignore
- dontforceignore
⍈ Exit Codes
| Exit code | Exit Reason |
|---|---|
| 0 | ASIST executed successfully with no findings |
| 1 | ASIST executed successfully with findings |
| 3 | ASIST failed due to internal error (file a bug report!) |
| 4 | ASIST failed due to user error (review input and config) |
🧩 VS Code Extension
Using the VSCode extension is by far the easiest way to get started with ASIST. When a file is opened or saved, ASIST will scan it to identify vulnerabilities.
Just like a linter, once the scan is complete, ASIST will annotate your code with the findings and the rule description. Findings can also be found in the “Problems” tab.
Workspace scans are also supported, making it easy to run ASIST on an entire project and address all your issues on the fly!
📦 Installation
The extension is available on the Visual Studio Code Marketplace.
⚡ Extension commands
ASIST commands can be run in VSCode by pressing Ctrl+Shift+P and typing ASIST to get the list of available commands.
Note that some commands will print results to the “Output” tab in VSCode (select ASIST in the channel dropdown).
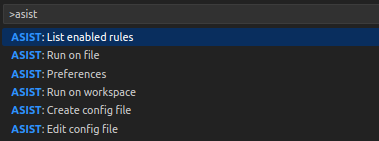
- Run on file: Runs a scan on the current opened file.
- Run on workspace: Runs a scan on the current project workspace.
- List enabled rules: Outputs a list of all the current enabled rules.
- Create config file: Creates a configuration file template if it doesn’t exist.
- Edit config file: Opens the configuration file with custom rules, if it exists.
- Preferences: Opens the extension settings.
🔕 Marking false positives
While using ASIST Extension, hover over the occurrence and click on Quick fix... option, and select Mark False positive, This will add the placeholder asist-ignore-begin and asist-ignore-end comments around the affected line, and fill in the relevant rule ID.

🛠️ Configuration file
For the VSCode extension to pick up your config file automatically, the file must to be named either .asist.yaml or .asist.json, and must be located at the root of the workspace.
You can create a configuration file using the Create config file command, which produces a self-documented template.
By default, ASIST looks for a config file in the root of the VSCode workspace, but if you like, you can specify a specific config file path (relative to the workspace) in the extension preferences instead – this can be useful when working with monorepos.
👾 Use a custom binary
This extension is shipped with prebuilt ASIST binaries, but if you need to specify a specific ASIST scanner location (which is very useful for developing new features!), here’s how:
- Open the ASIST
Extension settings - Navigate to the
Workspacetab - Enable the
Custom Binary Enabledsetting - Provide the path to your ASIST binary in
Custom Binary Path